| Author | Message | ||
| John and Barb Tesser (Bigrigger)
Registered Member Username: Bigrigger Post Number: 147 Registered: 9-2007 Posted From: 24.179.147.233  Rating: N/A |
Well, I have decided I have to make some ramps to back my bus onto. I do not have any inside room to work and so everything is done outside. When I redid my DD3 last year I block and jacked and jacked and blocked till I could get under to work, but it's not very practical and the other brake chamber is now leaking. So I intend to cut some ramps out of red oak timbers. I am thinking about a foot tall and maybe 18 inches wide, perhaps 6 feet overall with 2 feet of that being the top "deck" and 4 feet being the incline. These will just be sitting on the ground so they will need to be fairly stable. Anyone make any like this? Any ideas about height/width? Will my rear bumper hit too soon? I sure other busnuts will have thought all this out long before me, so I am looking for ideas. Its a MC5C so I only have to deal with a single rear axle. | ||
| John MC9 (John_mc9)
Registered Member Username: John_mc9 Post Number: 852 Registered: 7-2006 Posted From: 74.162.78.139  Rating: N/A |
I'm jumping the gun here, hoping this jogs the memory of the guys that posted this suggestion a long while back: The oak can crack (any solid wood can), and facing each piece with 3/4 plywood may be a good thing to do. Uhh... keep in mind, that if you're going to jack it, it still oughta' be blocked up around the jack, too! | ||
| R.C.Bishop (Chuckllb)
Registered Member Username: Chuckllb Post Number: 591 Registered: 7-2006 Posted From: 75.211.49.161 Rating: N/A |
Mine are built of well dried Ponderosa (when I had them made) ..10 inches wide x 8 inches high....3.5 foot "top deck" and 18 inch incline. Probably six years old. The coach has a tandem rear with air. It has been sitting on the blocks for the past two weeks; rear tandem on the blocks. When I use them, I use them both...not just one side. FWIW RCB | ||
| Dan West (Utahclaimjumper)
Registered Member Username: Utahclaimjumper Post Number: 159 Registered: 1-2005 Posted From: 208.66.38.60 Rating: N/A |
Remember, if you make them too long you will be forever crawling around them to work.>>>Dan | ||
| John and Barb Tesser (Bigrigger)
Registered Member Username: Bigrigger Post Number: 148 Registered: 9-2007 Posted From: 24.179.147.233  Rating: N/A |
Good ideas, and thanks to whoever emailed me about pouring a concrete pit. I had thought of that but really like the practicallity of being able to move them when needed. I have used red oak timbers for years on trailer decks and blocking and think it would be unlikely they would crack enough to break, but then again I guess you really can't be too safe under these things. Also hadn't thought of the length being a hinderence, thanks Dan. | ||
| FAST FRED (Fast_fred)
Registered Member Username: Fast_fred Post Number: 741 Registered: 10-2006 Posted From: 66.82.9.23 Rating: N/A |
"I am thinking about a foot tall and maybe 18 inches wide, perhaps 6 feet overall with 2 feet of that being the top "deck" and 4 feet being the incline." Basically they can only be as high as the chassis will allow , with the airbags flat. Otherwise you would need to air up to raise the body , which might BE the reason for needing the ramps. 2x8 or 2x10 BOLTED TOGETHER is just fine.MEASURE! Only needs to be as wide as the tire.Remember YOU get to lift them every time there used! With loads of hours under the bus , to enjoy! It is best procedure to lift two wheels on one side with 2 ramps for lubing the drive shaft universals and all the rest every 1500 miles , or whatever your book requires. You will also need a run up block , a foot wide 4 or 6 inch hunk of wood to run a flat front tire on to , to create space for an air jack . FF | ||
| John and Barb Tesser (Bigrigger)
Registered Member Username: Bigrigger Post Number: 149 Registered: 9-2007 Posted From: 24.179.147.233  Rating: N/A |
Thanks Fred, i hadn't thought about the bus being "flat" when I go to back on the ramp sometime. I am not sure about 2X8 though as we had a couple of those made like 3 steps we drive our class A on for leveling and they are both broken and I know that old Pace Arrow doesn't weigh half of what the rear of this girl does. I hadn't thought of the flat front tire scenario either...lots to learn even for an old truck driver! | ||
| Buswarrior (Buswarrior)
Registered Member Username: Buswarrior Post Number: 1530 Registered: 12-2000 Posted From: 76.66.16.254  Rating: N/A |
Please note carefully the comment that you have to be able to move these things when you are done! For both the physical exercise issues as well as storage... you don't want to be leaving those out where the weather will render them unsafe over time... I am a fan of properly layering pieces of 2x planks. Fully supported, tight formation, level ground. Once you finish experimenting, cuz just about everyone finds out the hard way that they are trying for too much rise over too short a distance... If you like, you can arrange your assembly in a way that allows you to drill some universal holes to allow a stabilizing rod to be dropped through so they stay still as you move on and off. When possible, I hate having single use jigs/tools/apparatus, and not having the ease of transportability. Having a place on the property with a depression running up the centre of the bus also is helpful. happy coaching! buswarrior | ||
| Mark Morgan (Stormcloud)
Registered Member Username: Stormcloud Post Number: 5 Registered: 9-2008 Posted From: 216.36.185.40 Rating: N/A |
I made my ramps from strips (12" wide) of progressively shorter pieces of 1/2" shop grade OSB board The bottom strip is 8 feet long, and the next strip is 7 feet, then they stack a couple of inches shorter for each layer. Screwed and glued, very heavy and will never collapse. | ||
| joe padberg (Joemc7ab)
Registered Member Username: Joemc7ab Post Number: 338 Registered: 6-2004 Posted From: 66.38.159.33 Rating: N/A |
A local bus garage uses 2x8 on edge properly bolted together with a fairly long ramp section. I am using ramps cut from a timber that a friend gave me about 6 inches high. DO NOT FORGET the stop at the end of your flat section. Joe. | ||
| Bruce Henderson (Oonrahnjay)
Registered Member Username: Oonrahnjay Post Number: 383 Registered: 8-2004 Posted From: 68.55.177.218  Rating: N/A |
If you're using a large, solid timber, a good plan is to make your cuts with a chain saw. You won't get a "pretty" cut but your diagonals will be symetrical. And don't forget the part about not making your ramp too steep -- you'll want them *much* more gradual than you'll think. | ||
| Ralph Peters (Ralph_peters)
Registered Member Username: Ralph_peters Post Number: 22 Registered: 12-2008 Posted From: 66.59.120.99 Rating: N/A |
My ramps are a full 6in.high X 8in. wide X 56in. long, ramp starts 1/2in thick goes to top in 18in.. The 18in. is measured on bottom, the angle of the ramp angle is about 17 dergees. I used them for my pick-up just fine, but needs to be 2-3in. wider for bus, how ever they will fit under the bus that has no air in the bags. The mc-5 went up the ramps at idle. You MUST make certain soil/ driveway is very solid. | ||
| Peter E (Sdibaja)
Registered Member Username: Sdibaja Post Number: 280 Registered: 5-2002 Posted From: 201.130.137.133  Rating: N/A |
years ago I made some ramps but now I just have a stash of various 2x4, 2x6, 4x12, etc. shorts and just build a stable pile, drive up and re-arange as needed... easy to stash the blocks that way too | ||
| David Evans (Dmd)
Registered Member Username: Dmd Post Number: 298 Registered: 10-2004 Posted From: 96.232.132.135  Rating: N/A |
I want the secret email about the pit also please!  | ||
| John and Barb Tesser (Bigrigger)
Registered Member Username: Bigrigger Post Number: 151 Registered: 9-2007 Posted From: 24.179.147.233  Rating: N/A |
Dave, I would tell you, but then whoever sent me the concrete pit info would probably have to hunt you down and really, how many people are there who could take care of that cool bus if you weren't around? | ||
| FloridaCliff (Floridacracker)
Registered Member Username: Floridacracker Post Number: 393 Registered: 7-2004 Posted From: 24.27.226.231 Rating: N/A |
John, I built my run up ramps out of 2X12's. I found thru experimentation that the easiest ramp to climb up on has a full tread width between inclines. Just extend the first length to match your height needed. I have four of these ramps, two stay at the shop and two I keep on the Bus, just in case. I used 2 1/2" deck screws to hold them together and added more screws to each layer in an alternating pattern. I added some metal handles on the side of them, mainly for hooking a bent metal rod to pull them out from under the coach. I also carry some misc cut offs pieces stacked between the ramps for blocking and a few 4X4's to put between the axle and frame on the body stops when I am underneath. Blocking the body is probably good enough, but it makes me feel better with the stops blocked also. Cliff | ||
| David Evans (Dmd)
Registered Member Username: Dmd Post Number: 300 Registered: 10-2004 Posted From: 96.232.132.135  Rating: N/A |
Come on! dont make us beg! besides you might need to use the pit on your way south! We need a pit in Penn! And if we ever had to get a "new" coach it would be a 5C. In fact our old 3703 is now a GMCI! As soon as i can learn how to post some pictures.... it now has a 6V71 with a dropbox rear end out of a 5C, so we really need a pit! enough begging! Thanks | ||
| John and Barb Tesser (Bigrigger)
Registered Member Username: Bigrigger Post Number: 152 Registered: 9-2007 Posted From: 24.179.147.233  Rating: N/A |
Okie Dokie, here is the email in it's entirety: thanks dosdogs1 appreciate the input. what I did: get a sheet of plywood 4x8 ................ wait...ok you park your bus same place at home..right ?? put the piece of plywood under there,under the engine/axel area....pull bus forward..mark around plywood ,rent a trencher,dig a 3" wide trench two feet deep around those marks,fill with concrete.next day,dig all dirt out two feet deep.....next day,pour cemente pads for drive wheels........bus can't fall because it isn't UP | ||
| Tom Caffrey (Pvcces)
Registered Member Username: Pvcces Post Number: 1272 Registered: 5-2001 Posted From: 65.74.69.200 Rating: N/A |
Below is a link to a ready made pattern for some blocks that we like well enough to have two sets. One stays in the bus and one stays at home for all of the rest of our equipment and vehicles. http://f1.grp.yahoofs.com/v1/MM3WSW0JeuDDAfYYuDPDVQV-WeLaES6NPzsJ6NTWGW0b02hFBj0t2dhXDa7KK c41rAtUjPxHvj8lquBdMO1fWy_Hia4/Run-up%20blocks/Run-up%20blocks.jpg You might need to register with the GMC Yahoo group to access this page. For what it's worth. Tom Caffrey PD4106-2576 Suncatcher Ketchikan, Alaska | ||
| joe padberg (Joemc7ab)
Registered Member Username: Joemc7ab Post Number: 339 Registered: 6-2004 Posted From: 66.38.159.33 Rating: N/A |
John Be carefull, A three inch wide wall without proper reinforcing I would never trust as the wall for a pit. The distance between the inside of your duals is 38 inches, leaving very little or no support for the inside wheel if your pit ends up being 48 inches wide. Pouring a wall without a proper footing would be another no no. I have a pit in my barn, only 2feet deep and 38 inches wide but supported on an 8 inch slab with standard 8 inch wall and the wall and floor poured simultaneous reinforced with rebar the size which the cement finisher had never seen before. i.e. very heavy. Donot take shortcuts or take anything for granted in this area. We want you to be around and enjoy your beast. Joe. | ||
| joe padberg (Joemc7ab)
Registered Member Username: Joemc7ab Post Number: 340 Registered: 6-2004 Posted From: 66.38.159.33 Rating: N/A |
John Be carefull, A three inch wide wall without proper reinforcing I would never trust as the wall for a pit. The distance between the inside of your duals is 38 inches, leaving very little or no support for the inside wheel if your pit ends up being 48 inches wide. Pouring a wall without a proper footing would be another no no. I have a pit in my barn, only 2feet deep and 38 inches wide but supported on an 8 inch slab with standard 8 inch wall and the wall and floor poured simultaneous reinforced with rebar the size which the cement finisher had never seen before. i.e. very heavy. Donot take shortcuts or take anything for granted in this area. We want you to be around and enjoy your beast. Joe. | ||
| Len Silva (Lsilva)
Registered Member Username: Lsilva Post Number: 215 Registered: 12-2000 Posted From: 24.164.20.23  Rating: N/A |
Careful design will allow you to stack them in a minimum space.  | ||
| john w. roan (Chessie4905)
Registered Member Username: Chessie4905 Post Number: 1386 Registered: 10-2003 Posted From: 71.58.110.9  Rating: N/A |
I used to have a set that I had a sawmill cut for me out of oak. 12"x 12" x6 feet. I then cut a slope on the two timbers with a chainsaw, leaving a 18? inch flat area on top. This gave me two for one. Used them for my first coach, an ACF Brill IC-41. Some observations; they worked, they were heavy, they should have been a couple of feet longer ( I had to get a little bit of a running start to get the coach up on all four), put STOPS on the ends ( got too much of a running start once and drove over ends. Coach dropped like a brick, or should I say coach. That coach had enough ground clearance so that no damage was done; it just bounced. THEN I put stops on the ramps.)I used them on asphalt. If you use these on the ground, make sure it is solid; rain can soften and cause ramps to tilt and be unsafe. It would be better if base is wider than top. You could make them modular, in that the ramp area could be removed while in use to eliminate them getting in the way while you are working. Of course, you'll have to remember to reconnect the ramp part when coming back off. Just an idea. I have a shop now with a full length pit. One thing nice about those rams when I no longer needed them: they made nice firewood. OR you could dig two footers of sufficient depth and inside width of inside duals, fill with concrete and some reinf. rods. Then excavate some soil from between 1 to 1 1/2 foot deep. You now have a low cost shallow pit. It only needs to be 10 to 12 feet long, since there is nothing under the middle of these coaches needing service. I have a short set like Lsilva for out on the road. | ||
| John and Barb Tesser (Bigrigger)
Registered Member Username: Bigrigger Post Number: 153 Registered: 9-2007 Posted From: 24.179.147.233  Rating: N/A |
Wow, thanks guys for all the good info. I knew if I asked, i would get more than I could digest. I really appreciate it though. This is really a great board and some very knowledgable bus owners ready to help out whenever. Len, I like the stackable look on those. Tom, for whatever reason, I wasn't able to make that link work even logged into yahoo, but thanks anyway! | ||
| Tom Caffrey (Pvcces)
Registered Member Username: Pvcces Post Number: 1273 Registered: 5-2001 Posted From: 65.74.69.200 Rating: N/A |
John, that might be because you are not a member of the group. If you are a member, then it's not the reason. Tom Caffrey PD4106-2576 Suncatcher Ketchikan, Alaska | ||
| Jack Hart (Jackhartjr)
Registered Member Username: Jackhartjr Post Number: 46 Registered: 8-2007 Posted From: 64.12.116.203 Rating: N/A |
Someone on the 'other' board has a diagram that shows how they made their own. Jack | ||
| Bob Baldwin (Bob4106)
Registered Member Username: Bob4106 Post Number: 168 Registered: 10-2004 Posted From: 24.74.180.20  Rating: N/A |
I think this is the one. I hope this well help. 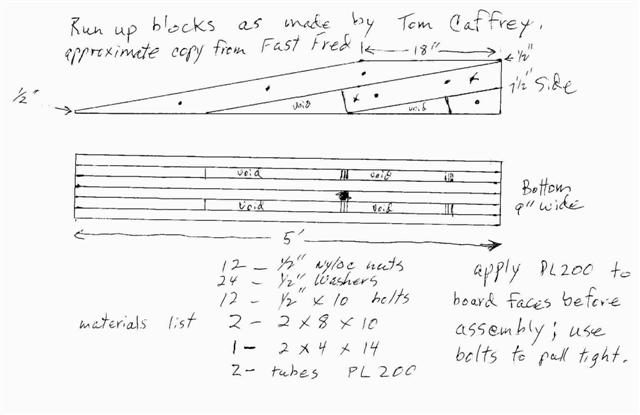 (Message edited by bob4106 on April 05, 2009) | ||
| Tom Caffrey (Pvcces)
Registered Member Username: Pvcces Post Number: 1274 Registered: 5-2001 Posted From: 65.74.69.200 Rating: N/A |
Thanks, Bob. We like ours very much. The voids are used as hand holds and I think that ours weigh about 40 pounds each. They are made of douglas fir, but spruce would make them lighter. These nest in the bay very nicely. Tom Caffrey PD4106-2576 Suncatcher Ketchikan, Alaska | ||
| FAST FRED (Fast_fred)
Registered Member Username: Fast_fred Post Number: 745 Registered: 10-2006 Posted From: 69.19.14.40 Rating: N/A |
I selected 2x8 as the material, and a 1/2 rod cut to sixe + nuts and washers was cheaper than long bolts . Construction glue is a cheap insurance. Fits (just) when aired down. FF |