| Author | Message | ||
| Larry Nelson (Larryn4106)
Registered Member Username: Larryn4106 Post Number: 19 Registered: 8-2008 Posted From: 173.30.230.77 Rating: N/A |
There has been some talk lately on the bus boards regarding starters. I have a fairly fresh starter on my 4106. But....I am starting to worry about a time, in the future, where I might have to replace my starter. I have read of others troubles getting access to the starter from inside the coach due to the access being blocked by cabinets, beds, etc. I will have that same problem. I don't even recall where that access is. When I look at the starter from the transmission door opening, I really don't see a "door" or access opening of any kind anywhere NEAR the starter. There seems to be a heat shield of some type, and maybe a door up higher over the top of the engine. Has anyone ever changed a starter on an 06 without going thru the firewall access, like working over the top of the tranny? Or getting down in front of the engine from below (yikes)? If anyone has a "uncovered" access hatch, could they take a picture of it? Maybe I am just paranoid. | ||
| Buswarrior (Buswarrior)
Registered Member Username: Buswarrior Post Number: 1551 Registered: 12-2000 Posted From: 76.71.103.235  Rating: |
Paranoia may be settled by preventive maintenance. You are asking the right question at the right time. Figure out how to access that starter in the quiet of the driveway. Preventive Maintenance: Some fleets simply change out big parts like starters, alternators and compressors at pre-determined intervals, based on the fleet experience with failures. Way cheaper to do it scheduled at home than broken down on the road, at the mercy of the vultures. In the case of a busnut, the removed good working item becomes your spare to be stored under the bed. How well do each of us know our major consumable parts? Working through all your air system valving and electrical components, and changing out to fresh parts, so you know their age and condition, is a fine preventive maintenance strategy to work on. Waiting for failure to change parts may be exciting for the busnut, but I'll bet SHE won't be impressed... happy coaching! buswarrior | ||
| R.C.Bishop (Chuckllb)
Registered Member Username: Chuckllb Post Number: 626 Registered: 7-2006 Posted From: 75.211.2.73 Rating: N/A |
Amen....and amen! RCB | ||
| Dan West (Utahclaimjumper)
Registered Member Username: Utahclaimjumper Post Number: 163 Registered: 1-2005 Posted From: 208.66.38.60 Rating: N/A |
My experience with starters has been, its usually not the starter, a wire, relay, plug, switch, etc. ect. The starter on an 06 is easly accessable thru the floor at the rear bulkhead ( I've changed mine twice in ten years as recently as last mounth) but does require the removal of an exhaust manifold. The bottom stud (of three) is the bitch to get to, and needs to be accessed from under the coach, not a fun job.>>>Dan | ||
| Larry Nelson (Larryn4106)
Registered Member Username: Larryn4106 Post Number: 20 Registered: 8-2008 Posted From: 173.30.230.77 Rating: N/A |
I have a Diesel Exchange engine, installed in 2002, all accessories new or rebuilt. To get to the access door, two water tanks and a bed would have to be removed. Might be easier to pull the whole cradle. | ||
| Dan West (Utahclaimjumper)
Registered Member Username: Utahclaimjumper Post Number: 164 Registered: 1-2005 Posted From: 208.66.38.115 Rating: N/A |
Larry, I have pulled these from the bottom, but its even less fun than the top.>>>Dan | ||
| Larry Nelson (Larryn4106)
Registered Member Username: Larryn4106 Post Number: 21 Registered: 8-2008 Posted From: 173.30.230.77 Rating: N/A |
Dan, I appreciate your responses. I have been in the nether-world down in the tunnel and I did not like it. Are you saying that, while difficult, it is possible to get the starter out from below? It appears to me that I might be able to remove two bolts from working thru the tranny door. Here is my big concern......if I really need that access door...I just don't have it without gutting the ass end of my conversion. I also have another question. When I look at my starter from the tranny door, I can SEE the innards of the solenoid. The cutaway view of the starter in the manual shows some sort of screw in cap at the end of the solenoid. Have I LOST this cap or was it just not replaced when the new engine was installed? | ||
| Dan West (Utahclaimjumper)
Registered Member Username: Utahclaimjumper Post Number: 165 Registered: 1-2005 Posted From: 208.66.38.60 Rating: N/A |
Larry, its not that bad to remove from below, I just run it up on ramps to get more room and go after it. The cap missing is a bad deal, it will invite corrossion and moisture problems, but maybe some one has used the broom stick method to start it in the past.>>>Dan Stinson 108-3 4106-1261 | ||
| Laryn Christley (Barn_owl)
Registered Member Username: Barn_owl Post Number: 606 Registered: 10-2006 Posted From: 153.2.247.35  Rating: N/A |
A starter shop will probably give you a cap. This is how I did my starter: 1. I securely chocked the wheels and blocked the bus up. 2. I unhooked the batteries. 3. Through the top access hole from the inside I removed the back top mounting nut. (The one closest to the engine block) 4. Crawling under the bus I sat up in the hole that is located ahead of the engine bulkhead. 5. Through the bulkhead cutout I removed the four bolts holding the engine breather on and placed the breather aside. Be sure to stuff a rag in the hole where the breather was on the side of the block. 6. I removed all of the wires to the solenoid and the starter. 7. I removed the bottom nut using a 15/16 boxed wrench cut down to an 8Ē length. (You could use a 15/16 socket if you have a wobble adapter) 8. I then removed the last top nut and slid the starter out onto my lap. (Be careful it is heavy, but not unmanageable) 9. Make sure the new starter is a 12v left hand starter. Check the starter mount to ensure it is the correct one. There are at least three types of mounts and the one you will need is the most uncommon. If you have your old one rebuilt it wonít be an issue, but I kept my old starter to use as a spare. 10. If you have an automatic tranny you will need a gasket for the starter mount to bell-housing face. 11. Installation is just reversing the above procedure. Even though the rebuilt starterís mount looked identical to the one removed, there was enough variation in the casting that I couldnít get my wrench on the bottom mounting nut. I used a socket and managed to get enough bite to tighten it. If I had a wobble adapter I think it wouldnít be an issue. You could also grind the mount in that area (itís plenty thick) to give your wrench clearance room, if you remember to do it before you mount it. My original starter solenoid was bad and I got a good deal on a rebuilt starter. I wasnít charged a core charge, so I am keeping the starter motor as a spare. I found that even some of the big starter rebuilders donít stock enough of the parts to rebuild a LH starter in one day, so having the spare will be nice. The solenoids are very common and inexpensive, so I donít feel a need to keep one of those on hand. Conclusion: Itís not as bad as people make it out to be. Unless you are physically not strong enough, this is a DIY job. I hope this might help the owner of a future 4106 starter swap.. Laryn | ||
| Dan West (Utahclaimjumper)
Registered Member Username: Utahclaimjumper Post Number: 166 Registered: 1-2005 Posted From: 208.66.38.60 Rating: N/A |
Laryn, now add to the problem of not having the top access hole available, thats his problem.>>>Dan | ||
| Laryn Christley (Barn_owl)
Registered Member Username: Barn_owl Post Number: 607 Registered: 10-2006 Posted From: 70.110.7.127  Rating: N/A |
I know, I just wanted him to know how easy it was if he had access. There might be others that don't have that problem that will be lurking and would like to know. | ||
| Dan West (Utahclaimjumper)
Registered Member Username: Utahclaimjumper Post Number: 167 Registered: 1-2005 Posted From: 208.66.38.60 Rating: N/A |
I have had to access mine twice out on the road and have been glad to have it.>>>Dan | ||
| Larry Nelson (Larryn4106)
Registered Member Username: Larryn4106 Post Number: 22 Registered: 8-2008 Posted From: 173.30.230.77 Rating: N/A |
Just to not get lost in the shuffle, if anyone is converting an 06, and has not yet gotten to the rear of the bus with improvements, I would LOVE to see a photo of that back bulkhead.....(from INSIDE the bus). But, if it is where I think it is I can't imagine it helping too much unless the exhaust manifold is removed. And, I have a followup question. If I can locate this access behind my "improvements", it appears that there is yet another "door" that must be removed to get a clear access to the starter. Please note the picture. I can SEE the edge of the door in the rear wall, but covering that, in the engine room, it appears there is another hatch, possibly acting as some sort of heat sheild. Thanks for all the help. 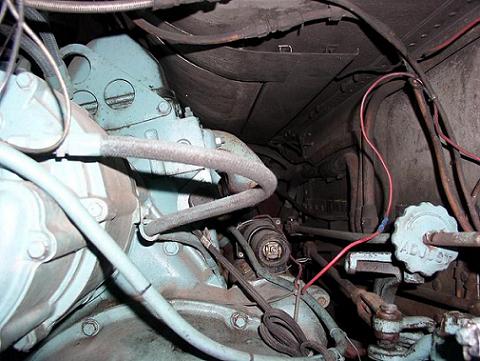 | ||
| marvin pack (Gomer)
Registered Member Username: Gomer Post Number: 432 Registered: 3-2007 Posted From: 71.55.197.237  Rating: N/A |
larry; that is where it is. It is very helpful in working on the engine on that side. All v-8 gmc's have that door and believe me it is worth making sure you don't cover it up when converting.If by chance it is,being a contorsion artist, it can be removed from underneath. That bolt you see on the right,kinda behind the wire is the easy one and you can remove it from where you stand. Oh by the way you need the cap for the end of the starter LOL gomer | ||
| Larry Nelson (Larryn4106)
Registered Member Username: Larryn4106 Post Number: 23 Registered: 8-2008 Posted From: 173.30.230.77 Rating: N/A |
Marvin, yes I had already mentioned the cap. Getting back to the access door issue....I believe I can "access" the access panel. I have removed some wood improvements and can replace them as removable pieces...BUT, and hopefully someone can answer this because the curiousity has me pulling my hair....if I had any. If I unscrew this panel from the inside, from the looks of my picture, it looks like all I will see from the inside is ANOTHER panel, since it looks that there is something covering that space, with about a 1/2" air space separating them. Can someone solve this mystery for me? | ||
| Dan West (Utahclaimjumper)
Registered Member Username: Utahclaimjumper Post Number: 168 Registered: 1-2005 Posted From: 208.66.38.60 Rating: N/A |
Larry, if you remove the "door" or panel, your looking at the exhaust manifold and the starter. The exhaust manifold is an easy four or five nut removal and a clamp on the exhaust pipe, then the starter is an easy do. You will need a 15/16ths socket and extension to reach all three stud nuts, I use a rope to encircle the starter and lift out.>>>Dan | ||
| Tom Caffrey (Pvcces)
Registered Member Username: Pvcces Post Number: 1278 Registered: 5-2001 Posted From: 65.74.69.200 Rating: N/A |
A lot of those starters have one bolt, that's the top one, which has a 9/16 12 point head, that can be broken loose with a manifold wrench. A 15/16 hex nut on the top does not have enough clearance to get a wrench on, from my experience. No matter which way you take the starter out, you have to disconnect all the wires. If you take it out by going though the hatch, the heat shield in the center of the photo will come out with the hatch cover. Then, the manifold has to be diconnected and moved out of the way. I found it easier to remove the transmission linkage and drop it down, then using a heavy rope, used it to swing the starter while getting help from outside to pull the starter out through the transmission door. From below, once the starter bolts were out and the breather removed, the starter came out without removing the manifold. While this is a difficult reach, I think it was the easiest. I wouldn't have tried it, but I mentioned pulling the starter to Ted Campbell in Williams, and he said that it definitely should be removed from below. For what it's worth. Tom Caffrey PD4106-2576 Suncatcher Ketchikan, Alaska | ||
| Bruce Henderson (Oonrahnjay)
Registered Member Username: Oonrahnjay Post Number: 394 Registered: 8-2004 Posted From: 4.153.53.83  Rating: N/A |
I can hardly believe this but, on my bus, the Brits -- the people famous for putting important 4" bolts 3" from a welded-on plate, putting the bolt holding the oil filter on in a place where you can't get a wrench on it, putting nuts inside a U-channel where you can't get a socket on them -- have my starter 6" from the rear bumper. I can reach in, access all fitting bolts or nuts and wiring, and drop it down, or lift it up and over the bumper, or -- if I'm feeling really hemmed in -- I can remove the center section of the bumper by pulling 4 large bolts and take the starter out straight rearward. On the other hand, the power steering pump can't be removed with the engine in the frame. | ||
| Larry Nelson (Larryn4106)
Registered Member Username: Larryn4106 Post Number: 24 Registered: 8-2008 Posted From: 173.30.230.77 Rating: N/A |
Well, I have "found" my hatch. I have to remove my mattress, and one panel of my bed platform, which I will make a bit easier tomorrow. (Remember, I have been using my conversion for 7 years.) I am not sure working on the starter from the bed platform will be easier than doing from below or from the side, BUT...I at least have the peace of mind knowing that I can open up that panel. Also discovered some evidence of Mickey and Minnie in the insulation over my water tanks. Tomorrow, I will vacuum all that mess out, redo the bed platform, and put it all together again. Then, from the drivers seat, keep praying that I will never have to experience the joy of removing and replacing my starter. And...Tom, thanks for pointing out that the "double" wall at the panel is a heat shield. Thanks to all others for the input. | ||
| marvin pack (Gomer)
Registered Member Username: Gomer Post Number: 434 Registered: 3-2007 Posted From: 71.55.197.237  Rating: N/A |
Larry; remember to cover EVERYTHING with rags,blankets,paper on the floor as not to get the grease tell tail signs all thru and on things in changing out the starter.LOL gomer | ||
| Larry Nelson (Larryn4106)
Registered Member Username: Larryn4106 Post Number: 25 Registered: 8-2008 Posted From: 173.30.230.77 Rating: N/A |
Gomer, I am hoping I never have to experience that. I doubt that my starter has had 300 "starts" since it's rebuild when the engine was put in. And my engine starts immediately. So far, it has not had to work too hard to get the engine going. I am going to get that cap for the solenoid. |