| Author | Message | ||
| Camill Paul Elbisser (Paul)
Registered Member Username: Paul Post Number: 48 Registered: 3-2005 Posted From: 208.102.217.212 Rating: N/A |
I want to weld in a piece of 3/8 steel plate just under � plywood floor. Then I can drill thru the plywood and steel then tap steel to mount copilot seat and seat belts. Can you tell me how far back from the stair well and out from the wall to the center the Seat base? We do not have the seat at this time All Ideas Appreciated Paul | ||
| Paul Lawry (Dreamscape)
Registered Member Username: Dreamscape Post Number: 470 Registered: 5-2007 Posted From: 64.40.216.58  Rating: N/A |
If it were me I'd have the seat and seat base so you would know the hole spacing. I wouldn't want to go to all that work and the holes not be centered with the base, or the proper location of the seat. Install the plate then drill and tap later. ~Paul~ | ||
| Jack Conrad (Jackconrad)
Registered Member Username: Jackconrad Post Number: 1032 Registered: 12-2000 Posted From: 71.3.157.139  Rating: N/A |
Paul, I agree with Paul, wait until you get your seat and pedastal before you drill and tap the holes. We did the same thing on our coach. We welded in 2 steel plates (one to attach the bolts in the front of the pedestal and one to attach the rear bolts). We ran the steel from the wall framing to the framing on the passenger side of then OEM "ramp" in the center of the bus. All pedestals are not standardized. I have several that have different base dimemsions and bolt patterns. Are you attaching the seat belts to this steel plate or to the seat? Jack | ||
| Bruce Henderson (Oonrahnjay)
Registered Member Username: Oonrahnjay Post Number: 400 Registered: 8-2004 Posted From: 70.60.107.86  Rating: N/A |
Paul, I'm in the same process. I agree with what others have written. I had access to a seat in another vehicle to measure base dimensions, etc. but I never was exactly sure until I got the seat on the floor. And there's a deal where you can't put in the floor until you weld in the plate and you can't weld in the plate until you have the floor in to position the seat ... Ain't busnuttin' fun???? | ||
| Paul (Paul)
Registered Member Username: Paul Post Number: 49 Registered: 3-2005 Posted From: 208.102.217.212 Rating: N/A |
I am going to call Bradd & Hall today to see if they can tell me. 1- How far away from the wall to place the pedestal so the seat can turn around. 2- How far back to place it so the seat will be out of the way of stair way when facing forward or to the rear 3- If there a code or law of how the seat belts must be installed Bradd & Hall no help I have a call in to Flexsteel now | ||
| Paul (Paul)
Registered Member Username: Paul Post Number: 50 Registered: 3-2005 Posted From: 208.102.217.212 Rating: N/A |
Planed on putting a 3/8 steel plate large enough that the pedestal could be moved 4" to 6" forward, back, right or left. This would mean a plate under the floor 6" to 12" in each direction larger then the seat base. There will be precious cargo in that seat (ME) the wife will be driving! | ||
| Mark Renner (Boomer)
Registered Member Username: Boomer Post Number: 160 Registered: 11-2006 Posted From: 206.58.200.38  Rating: N/A |
Paul, make sure your seat belt anchor points are to the STRUCTURE of the bus, not just to the floor. Really, the seat base should be bolted to the same also. In a frontal collision, the G forces are extreme. A few years ago a charter driver of an MC-9 hit a trailer in the freeway that had fallen off. At night. He had his seat belt on, but seat, driver and all was ejected through the windshield. The old rusty bolts snapped and everything pulled right out of the floor. Anchor everything to the front structure for safety. Don't know if any law outlines how this applies to conversions. Common sense rules. | ||
| Glenn Williams (Glenn)
Registered Member Username: Glenn Post Number: 215 Registered: 6-2006 Posted From: 216.163.56.194  Rating: N/A |
I put mine in last year, and there is no way I could have done it without the pedastal and seat. I needed to sit in it, turn it around, lean it back, walk past it to figure exactly where it should go. Don't rush! You will be VERY frustrated when you need to move it 8 inches and you only have 6 to work with! FWIW Glenn | ||
| Ron Walker (Prevost82)
Registered Member Username: Prevost82 Post Number: 382 Registered: 11-2003 Posted From: 208.181.210.47  Rating: N/A |
3/8 is over kill. 1/4 or 3/16 plate would be fine. I mounted the copilot seat on a swivel base so I made sure that it could swivel facing the rear of the coach. I mounted mine 24" O/C, back from the edge of the stair well and 20" O/C from the side. I have a narrow cabinet on the side for drink holder and maps etc. 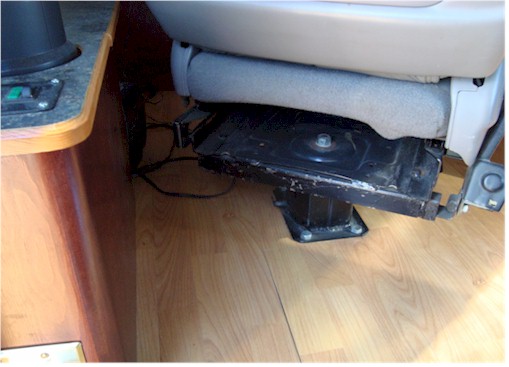 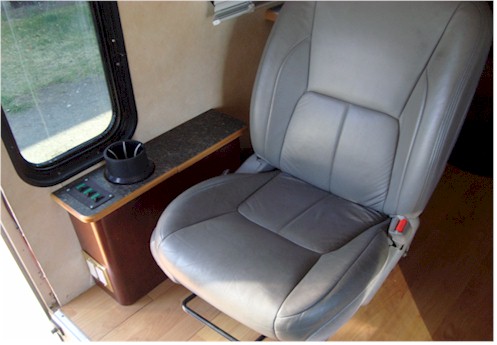 | ||
| Marc_bourget (Marc_bourget)
Registered Member Username: Marc_bourget Post Number: 14 Registered: 10-2006 Posted From: 64.142.42.176 Rating: N/A |
I agree that 3/8" is too heavy. If you're pulling up the floor (a good idea to check the accumulated silt above the wheel wells that's corroding your airbeams) I'd consider installing (welding) some hat sections or square tubing - of course after you've determined your distance requirements. Many Mfg's will have an installation drawing detailing bolt patterns, swing clearance, etc. why not check their website or contact tech support. It's something they provide to OEMs and RV Mfgr's | ||
| Paul (Paul)
Registered Member Username: Paul Post Number: 51 Registered: 3-2005 Posted From: 208.102.217.212 Rating: N/A |
Hi Marc We did pull up the floor and replaced the steel over the fiberglass wheel wells with Stainless steel. Then wire brushed and painted the same. We do not have airbeams on our 102A3 so we will not have that trouble. I did get a drawing from flexsteel. The largest radius is 26.9 the smallest 19.9 |