| Author | Message | ||
| R.C.Bishop
Rating: N/A |
....I have three bay doors left to remove. these 42 year old screws are tough tough tough.. I have liquid wrenched,...wd-40'd.....heated (all numerous times) beat, knocked, pounded, used screw extractors of various sorts,drilled, vice grips, you name it...... and still have 20 screws, out of 27, to remove...I don't have a plasma and doubt it would be practical on # 10 screws. I have used one on large stuff, but not such small holes. No wonder I waited so long to do it,but paint time is coming up in June/July, (I hope)and this needs to be done. Those rubber hinges have seen their last days. Any new suggestions? Just don't want to damage the skin anymore than necessary. Ohhhhh my.....  Thanx in advance for helpful suggestions. RCB '64 Crown Supercoach | ||
| Muddog16 (Muddog16)
Rating: N/A |
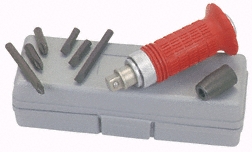
RCB, Good Morning! Have you tried a manual impact hammer yet, are these screws phillips heads? I've removed some really tough screws with mine. The one i have is made by Snap on, the bits come in different sizes for assorted size phillips, make sure you use the correct bit for the screw that you are removing. Good luck! Pat | ||
| John MC9 Rating: N/A |
Amen, on that manual impact hammer. I got two at Harbor Freight for under $6 each. I picked up an adapter at Sears, to allow the use of standard driver tips ( $5).  http://www.harborfreight.com/cpi/ctaf/displayitem.taf?Itemnumber=37530 | ||
| Gary Stadler (Boogiethecat)
Rating: N/A |
RC, are you trying to remove Gulmite screws? (those nasty little things with round, serrated heads) If so, just get (or make) the correct tool for the damned things and they'll come out mucho easy. Otherwise there is no easy way to remove them as you've found. They are hard as rocks, slippery as snail goo and stuck well. Let me know if you need to find the tools....  Otherwise about the only option that works is to Mig (or preferably Tig) weld a hunk of steel to the top of them and unscrew em that way. Takes some good welding talent but it works.... Gary (Message edited by boogiethecat on May 02, 2006) (Message edited by boogiethecat on May 02, 2006) | ||
| Richard Bowyer (Drivingmisslazy)
Rating: N/A |
I have a battery drill that has an impact setting and it works great on something like this. Richard | ||
| mel 4104
Rating: N/A |
a good trick if you are having trouble getting the screwdriver bit to hold to the screw head is -- take a sharp pointed pick and clean all the paint ,grease,dirt,etc out of the screw head, then use some medium grit valve grinding compound, dip the tip of the screw driver in it and when you go to turn the screwdriver besure to put lots of presure into the screw head to prevent theslipping. i use a 1/4 ratchetwith a short extension and 1/4 screwdriver bit for small screws and 3/8 set up for the larger screws. another trick is get a piece of sheet metal and drill a hole in it the same size as the head of the screw ,then using a welding tourch with a very fine tip, put the metat over the screw to sheild the area around it and heat the screw head red hot then turn out the screw this is where the ex. comesin as you will not bur your hand and be sure that you are wearing gloves. mel 4104 | ||
| Cliff (Floridacracker)
Rating: N/A |
RC, I just had to replace the center hinge in my 4905's baggage door. 3/4's of the screws were unremovable after, WD, PB buster etc...These screws were obviously damaged from years of moisture. What I finally had to do was predrill between each screw a new attachment hole. I did this on the screws that were "bonded for life". I then grinded of the uncooperative heads. When I replaced it all the holes matched up as they were drilled while it was in place. I have used the method Gary described of welding on a piece of steel with some success, but it will be a challenge with those small screws. Good luck Cliff | ||
| John MC9 Rating: N/A |
Re: "What I finally had to do was predrill between each screw a new attachment hole......I then grinded of the uncooperative heads.....When I replaced it all the holes matched up as they were drilled while it was in place. " Egads! What an absolutely great ^%$#* idea! And usually what we think of doing, after the panel's off. Your gold star: * | ||
| jlvickers Rating: N/A |
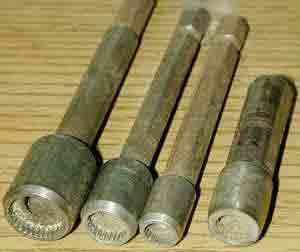
http://www.usatco.com/rivet_sets_19.asp It's called a Break loose loose tool You will need the 53-AK adapter and #2 phillips screwdriver bit and a rivet gun. This will make screws come loose used one for years in the avation industry. | ||
| Rob King Rating: N/A |
Hi RC If you don't plan to attempt to reuse the screws, can you use a 4 1/2" grinder to remove the screw head. Harbor Freight and other places have them for $40-50 or you might find one at a local pawn shop that does lots of tools for much less. I really like the idea of drilling a replacement hole before removing the door to use later, nice idea. Hope this multiple set of ideas help. Rob 91 LeMirage XL Missouri | ||
| R.C.Bishop
Rating: N/A |
Really interesting to see all the responses and ideas on this subject. Thanx for your input. Many of the things I have tried....repeatedly, but the a couple I haven't.. the Beak loose tool is intriguing, but....that kind of $$ for 20 +- screws is questionable. I like the "red hot" hole, but since heat has not given way thus far, I just wonder if the isolation theory would improve things...anyway, I think I'll give it a try. One of the problems I'm running into is that the heads tend to break off if the corrosion hasn't been completely loosened. Then a whole new problem arises....drilling out the screw....ever tried that with stainless?? Almost impossible from my point of view. Doing this without damaging the skin is key so that pretty well eliminates the possibility of grinding...maybe a last resort. So, at the bottom line.....we are going to keep tryin'...  Thanx folks....and in the event anybody has a new brainstorm, don't hesitate to "come back".   Gary...these are round head phillips, not the Crown head screws. I have a set of the extractors for the CH type. RCB | ||
| Gary Stadler (Boogiethecat)
Rating: N/A |
RC, if the screws really are stainless, you can drill them very easily IF you use the correct "goo" to lubricate and cool the drill bit. The correct "goo" is a green water-based cream-consistancy product called "Westlube" made by westland products PO Box 1742 Penn Valley, California 95946-1742 Ph. 888-475-5440 (Their webpage is currently down but if you type in westlube to google you can get a cashed version) So let me tell you about Westlube. I work with stainless steel daily in my business. I have to drill a lot of holes, ranging from 1/8" up to a few inches diameter with hole saws. When I began this work, it used to almost be a drill bit per hole. That was actually acceptable due to the cost structure of my work. But it was a pain. Then a guy brought me a bottle of Westlube. Instantly my scenario changed from one drill bit per hole to more like 200-300 holes per drill bit. Drilling, punching, lathe work and milling operations all instantly became more like working with aluminum than stainless. The stuff is magic. If you use a sharp bit and some Westlube, and use SLOW speed, you'll find drilling stainless to no longer be a big deal. So that's my snake oil story, and it's true. I've never had a turnaround work out this good in many years. Get some Westlube and be amazed... Oh... it's water soluble when it's not dry. After it's dry the easiest way to get it off is with some naptha or lighter fluid.... FWIW... Cheers | ||
| Kyle Brandt (Kyle4501)
Rating: N/A |
I've had great success with cobalt drill bits when drilling stainless. Now I'm gona have to get some Westlube. The right tools & technique make all the difference! kyle4501 | ||
| R.C. Bishop
Rating: N/A |
OK Gary....I thank you for that input...I agree about slow, lube, etc on stainless....but, screws (these at least)are 1 inch long...or about 5/16, maybe a 1/4 from head thru connection..... and yes, these are the best cobalt bits available. Thanx... I'll give it a try. RCB | ||
| Gary Stadler (Boogiethecat)
Rating: N/A |
As a last resort, maybe you could use a cutter similar to a "reverse spotfacer" to cut the head off of the old screw and use the rest as a pilot guide, and core it out. It would leave a larger hole but it might be an option... Ie: Reverse Spotfacers from MSC tool (Message edited by boogiethecat on May 04, 2006) | ||
| motorcoach1 Rating: N/A |
I had to drill out 5000 rivets out of a Blue Bird to put new sideing on and used good colbalt jobber mill bits and Tap Majic they sell at Granger ,,works like butter...works on stanless too ..if your drilling on the side of the bus put a little foam ball on the drill bit to hold the lub and keep it from running down the side. |