| Author | Message | ||
| H3-40 (Ace)
Registered Member Username: Ace Post Number: 872 Registered: 10-2004 Posted From: 75.248.40.157  Rating: |
I posted this on the MAK board but I thought I needed to share it with my BNO friends too. Updating the LED'S on my H3 which so far is just the rear engine cover that consist of 17 lights. 9 red, 4 amber, and 4 all clear back up! I made a SS mirror finish panel to dress them up even a little further. Here is a picture of the first panel that will be on the drivers side with lights installed. If this one works as planned then I will get the second panel finished by Sunday! Total cost of all the lights is $530.00 including shipping from Texas. Far better than what I have heard and seen from other people and other places so I figure this isn't too awful bad! Once these are in, on, and working, I will continue to the side markers! If anyone needs or wants information on sources and prices for the 84 series lights, let me know! The back up were the hold up since nobody offered a completely all clear lense until I pushed and pushed (more like hounded) the mfgr into doing it! It took them 6 weeks but they finally came and they look awesome! Now they ALL match! The B/U light on upper right appears to be crooked but it only has one screw in it at this time! Also the blue tape on the floor is now gone as Susan has finished painting all the new base boards I recently installed in our new remodeled kitchen! LOL Ace 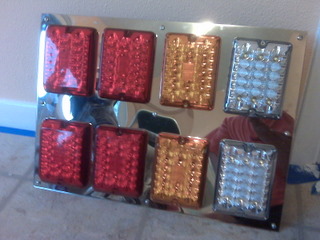 | ||
| Mark Renner (Boomer)
Registered Member Username: Boomer Post Number: 101 Registered: 11-2006 Posted From: 209.33.83.196 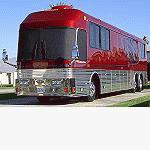 Rating: N/A |
Ace, that's a super looking job! Now you need to make a SS insert for the license plate recess like the converters do. Nice work, and price good too. | ||
| Bruce Henderson (Oonrahnjay)
Registered Member Username: Oonrahnjay Post Number: 252 Registered: 8-2004 Posted From: 69.143.48.38  Rating: N/A |
Hey, Ace, are these 24V lights? If so, where did you get them? I'm in the middle of a light project (the shells/frames and reflectors on my front parking lights/turn signals and all my rear lights are rusting pretty badly so I need to replace them all -- pretty big project). I'm going to need: Rear, stop/tail, red, 4 Front/Rear, turn, amber 6 Side, turn-repeater, amber 2 (could be same as front/rear turn Backup, white, 2 Thanks, BH NC USA | ||
| H3-40 (Ace)
Registered Member Username: Ace Post Number: 873 Registered: 10-2004 Posted From: 206.53.144.18 Rating: N/A |
Thanks Mark, I appreciate the atta boy! Still more to do after the light project! Bruce the lights I used are all 12v. Not sure about finding them for 24v. Sounds like you have even a larger project than what I took on! LOL Ace | ||
| Tim Brandt (Timb)
Registered Member Username: Timb Post Number: 186 Registered: 10-2003 Posted From: 74.251.162.133 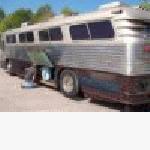 Rating: N/A |
On small panel LED projects I have worked on I have dropped 32V down to 12V though an inline resitor before each LED. Very small draw for what I was doing so I don't know if the same would apply here | ||
| marvin pack (Gomer)
Registered Member Username: Gomer Post Number: 264 Registered: 3-2007 Posted From: 71.55.193.220 Rating: N/A |
Hey ACE that is the way to go. Man they are sharp. Now about 24 volt, You can get a power supply that will put out up to 30 volts DC and go to radio shack and buy some resistors,with a little figuring about voltage drops and get one with proper wattage and test the voltage drop voltage. It doesn't take much to figure it out and it will look SO COOL. Keep informed about it. gomer | ||
| H3-40 (Ace)
Registered Member Username: Ace Post Number: 874 Registered: 10-2004 Posted From: 216.9.250.106 Rating: N/A |
Just mounted the complete light assy panel on the bus for the first time. Good thing is, it fit perfectly! Next step was to supply bus current to the lights! Ok good! They work except I need to air it up to try the brake light and the B/U lights! Waiting for darkness although they are plenty bright in daylight! Ace | ||
| H3-40 (Ace)
Registered Member Username: Ace Post Number: 875 Registered: 10-2004 Posted From: 70.220.105.167 Rating: N/A |
Oh YEA! They "are" different to say the least! In darkness they are what I would call very clear where as the incandescents are soft and the amber turn signals will just about blind you if you look at them long enough! In fact you can't! It starts to get annoying if you look to long! Tomorrow will be the true test when I air it up. One thing is, I have my doubts about the brake lights. The LED light connector has a dual element contact where as the original bulb had a single contact using a dual filament. I think if I connect the two contact's the brake light will be on full time! Not sure what activates the LED to be a brake light! Ace | ||
| David Lower (Dave_l)
Registered Member Username: Dave_l Post Number: 18 Registered: 11-2007 Posted From: 206.248.163.2 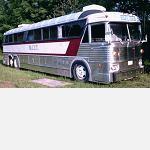 Rating: N/A |
A WARNING TO ALL! At the top of this page there is three adds for LED lights. It is the one on the left or the centre one cant remember and am not going back to find out, has been hacked and it tries to get into your computer very fast! it is a link inside one of those sites, so be careful! Dave L | ||
| H3-40 (Ace)
Registered Member Username: Ace Post Number: 877 Registered: 10-2004 Posted From: 75.201.225.160 Rating: N/A |
Today came and after running some errands I was excited to go out and start up the bus. After it aired up, on went the lights! Running lights checked out ok, then I released the parking brake. I hit the foot brake and WOO HOO, the brake lights lit up bright as ever! No wiring problems what so ever! One more check would be the back up lights. Slipped the tranny in reverse and you would have thought someone lit up a ball park in the field behind where the bus is parked! 2 all clear LED lights actually reflected off a barn which sits about 100 or so yards behind the bus! It was simply amazing that small lights can be so bright! And the good thing is, that's only the one side which I might also add that the original SS panel I made was going to be for the Drivers side but I opted to install it on the passenger side as you can see below. Also in the picture you will see that the amber turn signal looks odd. It's the angle of my phone. Trying to catch it ON was sort of hard AND you will notice the red lights are dim. I had them wired backwards where only half the LED's were lit. Since then, they have been wired correctly! Ace 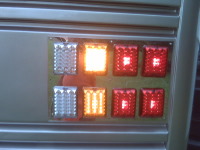 | ||
| Chuck Newman (Chuck_newman)
Registered Member Username: Chuck_newman Post Number: 267 Registered: 1-2005 Posted From: 99.170.66.106 Rating: N/A |
Ace, Really great professional looking job. Does the place in Texas have a web site with specs and can we order over the web? Thanks. | ||
| H3-40 (Ace)
Registered Member Username: Ace Post Number: 879 Registered: 10-2004 Posted From: 216.9.250.64 Rating: N/A |
Yes the place in Texas is texmood.com. That's who I got the Bargman all clear b/u lights from. They were a little higher in price but great to deal with! I will have to look up and see who I got the other lights from. Something like PPL or something! I will post it when I find it! They were cheaper per light! Ace | ||
| H3-40 (Ace)
Registered Member Username: Ace Post Number: 881 Registered: 10-2004 Posted From: 75.201.225.160 Rating: N/A |
Here is the place on the web that I bought the red and amber lights from at 22.00 each on sale. Actually they were 27.00 but when I order as many as I did, the youngster dropped the price even further! http://www.pplmotorhomes.com/index.html Then I went and found the all clear back up lights from Ki Moody and here is his site. http://www.texmood.com/catalog/index.php?cPath=51 Hope this helps! Ace | ||
| Chuck Newman (Chuck_newman)
Registered Member Username: Chuck_newman Post Number: 268 Registered: 1-2005 Posted From: 99.170.66.106 Rating: N/A |
Thanks Ace. | ||
| Austin Scott Davis (Zimtok)
Registered Member Username: Zimtok Post Number: 269 Registered: 9-2006 Posted From: 216.37.73.226 Rating: N/A |
It looks great... Very professional looking. . | ||
| David Lower (Dave_l)
Registered Member Username: Dave_l Post Number: 60 Registered: 11-2007 Posted From: 99.249.16.254 Rating: N/A |
Hi Ace Great looking job! What did you use to cut the stainless steel. Dave L | ||
| H3-40 (Ace)
Registered Member Username: Ace Post Number: 891 Registered: 10-2004 Posted From: 75.249.167.90 Rating: N/A |
Thanks guys! So far I like the way they turned out! David, a friend of mine used a shear at his sheet metal shop to cut the panels to size. I cut the inner hole for each individual light using a jig saw! I first drilled a hole in each corner and then sawed to each hole. Perfect? Hardly, but what can't be seen is just as good! Ace |