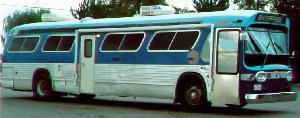
![]() n the front of my bus behind the driverís seat, I placed a regular house couch. To solve the problem of the couch being too tall, I cut into the rear frame of the couch so it would fit over the hump. I used plywood with a matching wheel well arch cut into it to support the back of the couch's frame. I had to build a plywood box under the couch to raise it up 9 inches above the floor. This, of course, would vary, depending on where the arch needed to be cut, based on your floor plan and the model of transit bus you are working with. My couch originally came with 4 inch legs, so it is now 5 inches taller than its original height. Since no one in my family ever sits on a couch with their feet hanging over the edge, I donít think that will be a problem.
n the front of my bus behind the driverís seat, I placed a regular house couch. To solve the problem of the couch being too tall, I cut into the rear frame of the couch so it would fit over the hump. I used plywood with a matching wheel well arch cut into it to support the back of the couch's frame. I had to build a plywood box under the couch to raise it up 9 inches above the floor. This, of course, would vary, depending on where the arch needed to be cut, based on your floor plan and the model of transit bus you are working with. My couch originally came with 4 inch legs, so it is now 5 inches taller than its original height. Since no one in my family ever sits on a couch with their feet hanging over the edge, I donít think that will be a problem.
The first thing that I got rid of was the front door. It took up too much room and I wanted passenger space for my three children to roam around. I took out the first 30 feet of the original floor from the front of the bus and replaced it with new plywood because it was getting old. My work in a plywood plant provided me the opportunity to do this quite inexpensively. Removing this portion of the floor also facilitated sheeting over the front stairs, creating level floor space next to the driverís area.
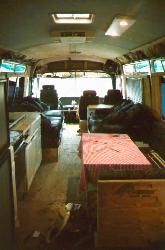
The front seats are out of a Dodge Stealth. One gray leather driver seat with 12 way power and the passenger side has 2 more mounted on a plywood box. They are burgundy in colour. The plywood box is mounted over the first 12 inches of the wheel hump, cut and shaped appropriately as the couch was, described above. Rearward, on the other side of the wheel hump, is a matching love seat that I mounted at the same height as the couch. Between the couch and passengers seats on the same side, I took a 21 inch high lower cabinet and created a coffee table out of it. Again, this cabinet is notched in the back to allow it to go over the wheel well. The drawer part of the cabinet works but thereís obviously not much room inside when the door is opened.
 . . . . . . . . . . .
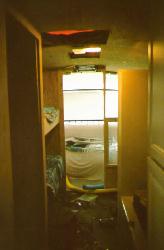
The rear passenger side wheel well hump has a bunk bed installed over it (that was an easy one!). On the driverís side, I took a standard size 5 foot bath tub that drains on the right and on the left, it has a sloping back that I put against the wheel hump. The rest of the wheel hump area will eventually become closet space.
Fresh water is stored under the dining bench. The bench I made is similar to what is commonly found in restaurants. It is L-shaped and extends 6 feet down the side of the coach and comes out from the wall 41 inches. This is located on the passenger side beside the loveseat and goes rearward to the middle door. The 52 gallon fresh water tank is under the 6 foot section.
 The configuration of the original bus heating system was a series of ducts strapped to the plywood of the floor from the underside. I removed all of these ducts and brought new 5 inch ductwork up through the floor and ran it above ground
throughout the bus. This freed up area under the floor of the coach for tanks. Mounted directly under the bath tub is a 33 gallon gray water storage tank. I mounted a second gray water tank in the middle of the bus to accommodate the galley area. These 2 tanks are connected and vented so they will fill up equally, as water is sent to them.
 The bathroom is 3 feet x 3 feet and is located on the passenger side between the middle entrance and the bunk beds. Two fixtures grace the bathroom - toilet and sink. The 45 gallon black water holding tank is mounted under the toilet. I have the bathroom sink emptying into the black water tank. This is not ideal, but it was necessary and convenient. The tanks I used are plastic. The three waste tanks had flanges on top making them easy to mount onto the floor. The fresh water tank under the dining table is just sitting on the floor and is corralled by plywood.
I have one bay, which I havenít built yet, which measures 7 feet x 7 feet x 21 inches and is behind the front wheels. There will be storage under where the old front stairs were. There will be one storage area behind the passenger side rear wheel and the generator will go behind the driverís side rear wheel.
The other problem with transits, if you didnít know already, is that they donít go very fast. Mine does 57 mph at 2,175 rpm. Until I have many more hours under my belt, the fastest I would want to go is 65 mph. There are several ways I can get there: Iím going to adjust the governor and crank up the rpmís on the 6V71 to 2,450 and see how fast that gets me. Another option that Iím considering, as I was told the other day on the chat, is to replace the now installed 22.5 inch tires with 24.5 inch tires.
 This tire topic raises a number of questions that can be a whole "Article of Interest" on its own. I measured some 24.5 inch tires which had a circumference of 147 inches. The 22.5ís that are on my bus are 133 inches. Thatís a difference of 10%. In calculating the difference in speed, my current 57 mph plus 10%, or 5.7 mph equals 63 mph. The question: Can I just have the 24.5ís installed on the rear or would I have to do the front also? Would changing the rear end differential make a significant difference?
I will have to weigh all the costs and figure out what is best. Meantime, I am happy driving 57 mph. I just love driving my bus :-) Itís the other people on the road that I donít want to irritate!
